what is AnimaEngine?
AnimaEngine is an application designed to customize desktops using animations, GIFs, images, videos, and audio in various formats such as MP4 and WEBP. It also incorporates artificial intelligence tools that allow users to edit visuals, remove backgrounds, and create unique styles. The software is currently in development and will be available soon on the Steam platform.
All about MDAA files
WHAT IS A MDAA:
MDAA files are compressed archives that contain resource packs (animations) and behavior packs (.mddo and .exe files). These files must include all the necessary animations and executables required for their proper functionality. When creating an MDAA file, it is essential to ensure that everything needed for execution is included so that users do not have to download external packages. Essentially, an MDAA file serves as a virtual environment that, when combined with the Anima engine, performs unique actions.
How to create a MDAA:
The first thing to know before creating an MDAA file is that you don’t need to be an expert programmer to do it. Even with the help of artificial intelligence, it is possible to achieve great things.
The second important aspect is understanding how communication between AnimaEngine and the behavior pack works. It functions as follows:

As seen in the diagram, the core communicates with AnimaEngine using two files: one for instructions and another for activation. Each file has its own structure.
- The actions.mddo file specifies which animation will be executed, at what coordinates, and whether it will be displayed or not.
- The activation file determines whether there is content waiting in the buffer to be executed.
Therefore, it is essential to generalize the following two structures in any programming language used to create the core.exe, ensuring proper writing to the files:
Python
""""
# Opens (or creates) the 'actions.mddo' file in write mode and saves a list with:
# [show/hide (1/0), Animation file path, optional position in (x, y)]
# - Position 0: 1 = Show animation, 0 = Hide animation
# - Position 1: Path of the Animation file to display.
# - Position 2: Coordinates in the format '1-(x,y)' if 0 = inactivate if 1 = Activate
""""

with open("temp\\actions.mddo", "w") as file:
  file.write(f"[1,'temp\\\\comeFiles.apng','1-({x},{y})']")
 """"
 # Send the signal to the file that there is content in the buffer.

 """"
 with open("activador.act", "w") as file2:
   file2.write('1')
As you can see, it’s not very complex. These two modules are all that’s needed to communicate with the AnimaEngine core. The most challenging part is obtaining the animations, but if you’re a skilled artist, this won’t be an issue. If you’re not, the tools we provide can help you use animations from other artists—just DON’T FORGET TO GIVE THEM CREDIT.
With this foundation, you’re now ready to create your first MDAA. Let’s move on to the next section!
CREATE YOUR FIRST MDAA:
We will create your first MDAA to show that it’s not very complex. We’ll use Python for core.exe since it’s simpler and more efficient for tasks like this.
Our MDAA will make a Megumin animation appear along the edges of the monitor at a random position every X seconds. Let’s get started!
First, we will create the code to generate random coordinate detection on the screen without repeating on the same edge.
import random
import time
import pyautogui

# Get screen size
screen_width, screen_height = pyautogui.size()

# List of possible borders
borders = ["top", "bottom", "left", "right"]
last_border = None  # Stores the last selected border

def get_random_border_coordinate():
    global last_border

    # Choose a border different from the last one
    available_borders = [b for b in borders if b != last_border]
    current_border = random.choice(available_borders)
    last_border = current_border  # Update last selected border

    # Generate a coordinate on the selected border
    if current_border == "top":
        return random.randint(0, screen_width), 0
    elif current_border == "bottom":
        return random.randint(0, screen_width), screen_height - 1
    elif current_border == "left":
        return 0, random.randint(0, screen_height)
    elif current_border == "right":
        return screen_width - 1, random.randint(0, screen_height)

# Continuous execution loop
while True:
    coord = get_random_border_coordinate()
    print(f"Generated coordinate: {coord}")

    # Wait for a random time between 10 and 30 seconds
    sleep_time = random.randint(10, 30)
    time.sleep(sleep_time)
The previous code generates the coordinates and displays them in the console, which is a good foundation to work from. Now, it’s time to connect the behavior with the resources. First, we will modify the code to add communication with AnimaEngine.
import random
import time
import pyautogui

# Get screen size
screen_width, screen_height = pyautogui.size()
current_border=""
# List of possible borders
borders = ["top", "bottom", "left", "right"]
last_border = None  # Stores the last selected border


def get_random_border_coordinate():
    global last_border,current_border

    # Choose a border different from the last one
    available_borders = [b for b in borders if b != last_border]
    current_border = random.choice(available_borders)
    last_border = current_border  # Update last selected border

    # Generate a coordinate on the selected border
    if current_border == "top":
        return random.randint(0, screen_width), 0
    elif current_border == "bottom":
        return random.randint(0, screen_width), screen_height - 1
    elif current_border == "left":
        return 0, random.randint(0, screen_height)
    elif current_border == "right":
        return screen_width - 1, random.randint(0, screen_height)


# Continuous execution loop
while True:
    x,y = get_random_border_coordinate()
    if current_border == "top" or current_border == "bottom":
        with open("temp\\actions.mddo", "w") as file:
            file.write(f"[1,'temp\\\\megumi{current_border}.gif','1-({x},{y+109})']")
        with open("activador.act", "w") as file2:
            file2.write('1')

    else:
        with open("temp\\actions.mddo", "w") as file:
            file.write(f"[1,'temp\\\\megumi{current_border}.gif','1-({x+111},{y})']")
        with open("activador.act", "w") as file2:
            file2.write('1')


    time.sleep(1.39)


    with open("temp\\actions.mddo", "w") as file:
        file.write("[1,'temp\\\\022Fl (1).gif','0-(0,0)']")
    with open("activador.act", "w") as file2:
        file2.write('1')

    print(f"Generated coordinate: {x,y}")
    print(current_border)

    # Wait for a random time between 10 and 30 seconds
    sleep_time = random.randint(10, 30)
    time.sleep(sleep_time)
The variable coord was changed to the tuple (x, y), the section for communication with AnimaEngine was added, and modifications were made to the sample animation coordinates.
 x,y = get_random_border_coordinate()
    if current_border == "top" or current_border == "bottom":
        with open("temp\\actions.mddo", "w") as file:
            file.write(f"[1,'temp\\\\megumi{current_border}.gif','1-({x},{y+109})']")
        with open("activador.act", "w") as file2:
            file2.write('1')

    else:
        with open("temp\\actions.mddo", "w") as file:
            file.write(f"[1,'temp\\\\megumi{current_border}.gif','1-({x+111},{y})']")
        with open("activador.act", "w") as file2:
            file2.write('1')


    time.sleep(1.39)


    with open("temp\\actions.mddo", "w") as file:
        file.write("[1,'temp\\\\022Fl (1).gif','0-(0,0)']")
    with open("activador.act", "w") as file2:
        file2.write('1')
Let’s explain the following section of code, which communicates with the Anima engine. First, we extract the coordinates as the tuple (x, y). Then, we check if current_border == "top" or current_border == "bottom": to determine whether the animation will be displayed at the top or bottom of the screen. If it will be in one of these positions, the code proceeds to this section:
with open("temp\\actions.mddo", "w") as file:
            file.write(f"[1,'temp\\\\megumi{current_border}.gif','1-({x+111},{y})']")
        with open("activador.act", "w") as file2:
            file2.write('1')
This part of the code writes to the buffer, indicating that an animation is required, where the animation is located (it always starts with temp\\), and the coordinates where it will be displayed. The y+109 is used to adjust the animation’s vertical position because the animation is centered, so if we don’t adjust it, the image will be cropped. After that, we send a start signal to activador.act to trigger the execution of the animation.
        with open("temp\\actions.mddo", "w") as file:
            file.write(f"[1,'temp\\\\megumi{current_border}.gif','1-({x+111},{y})']")
        with open("activador.act", "w") as file2:
            file2.write('1')
If the animation is going to be displayed on one of the sides (left or right), the process is basically the same, but this time we adjust the x coordinate instead of the y. The x+111 is used to elevate the horizontal position of the animation because it’s positioned in the center, and without this adjustment, part of the image would be cut off. The activador.act file still sends the signal to start the animation.
time.sleep(1.39)
    with open("temp\\actions.mddo", "w") as file:
        file.write("[1,'temp\\\\022Fl (1).gif','0-(0,0)']")
    with open("activador.act", "w") as file2:
        file2.write('1')

    print(f"Generated coordinate: {x,y}")
    print(current_border)

    # Wait for a random time between 10 and 30 seconds
    sleep_time = random.randint(10, 30)
    time.sleep(sleep_time)
Finally we wait for 1.39 seconds, which is the time the Megumi animation takes to move up and down. After that, we send a final action to the engine, which will show a “dead” animation to clear the screen, preventing any leftover visuals from remaining. Then, we wait for a random time between 10 and 30 seconds before the animation appears on the screen again.
CREATE DE .EXE:
Alright, now we reach the most important part: creating the executable. We use Python as the base language, but you can use any language, such as C++, Java, Ruby, etc. The key requirement is that the executable must be capable of reading and writing files, which is a feature available in almost all languages today.
In short, the executable must run without requiring the installation of any dependencies. This means the user must ensure that their core.exe includes all the dependencies within the project folder. The project folder must have the following structure:

It should be housed within a main folder, which in this case we have named “megumin.” The name of this folder doesn’t matter if modified. Next, there must be a folder named temp. Important! This name must not be modified. Inside the main folder, there should be the main file(s) or the files that make your core function.

Inside the temp folder, there should be the animations to be used, the audio files, the actions.mddo file, and any other files that your app requires.
As we discussed earlier, since we use Python as the base language for our MDAA, the easiest way to convert from .py to .exe is by using auto-py-to-exe, which is a relatively simple graphical tool to use.
If you need to know more about how to use this tool, below we provide a tutorial, or you can look up information about this app on your own.
By decree, all apps must have this icon.

Otherwise, during the review process, it may not be accepted.

Once the .exe is created, we need to place it in our main directory along with the temp folder and the core files. After verifying that everything is working correctly, we can proceed to package it for distribution.
MDAA PACKING:
In our AnimaEngine app, from the taskbar dropdown menu, we will select the option Advanced Code Animation, which will take us to a window like the one in the image.

We will select the Create MDAA option.
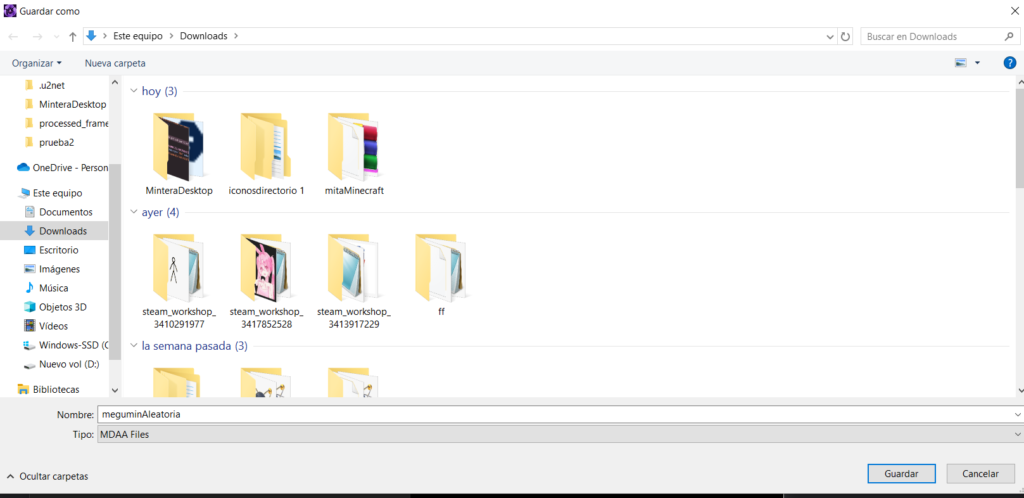
In the first window, we will choose the name under which we want to save our file.
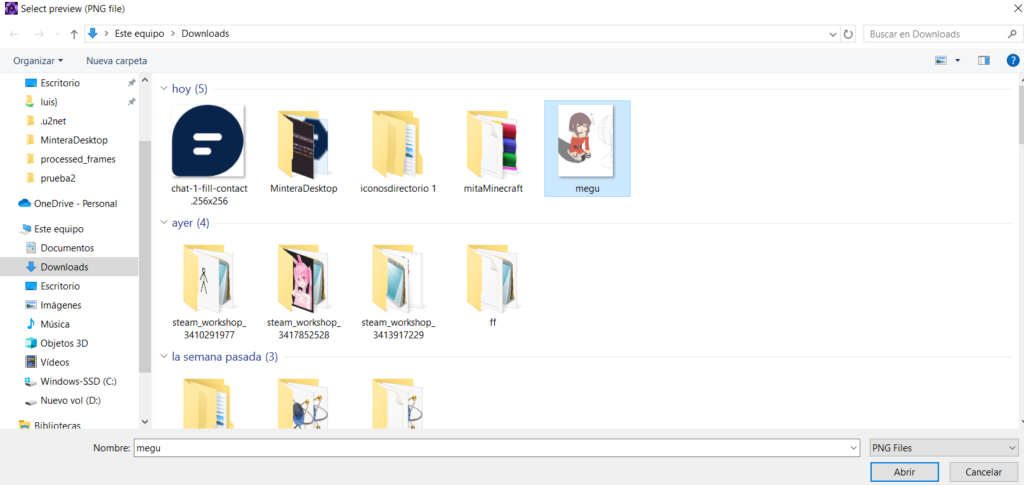
In the second window, we will select a preview .png image.
In the third window, we will select the .exe file we created.

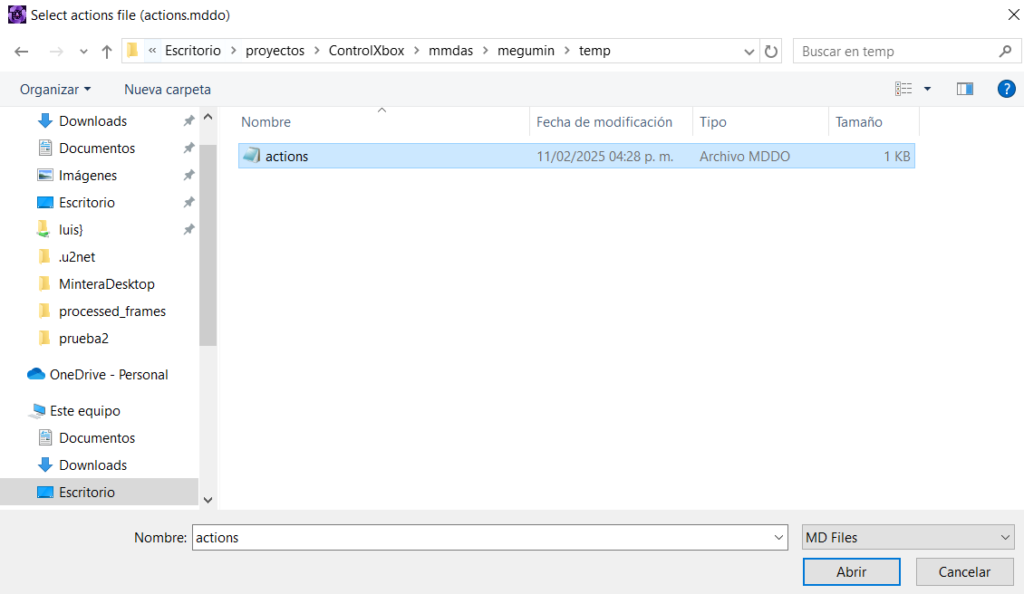
In the fourth window, we will select the actions.mddo file.
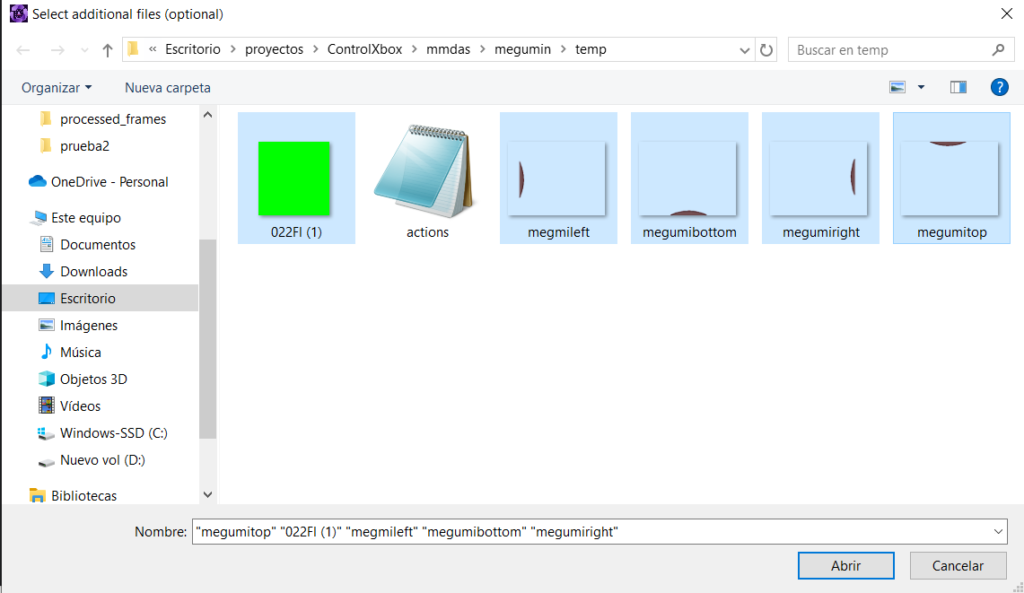
In the fifth window, we will select all the necessary files for execution, which, in this case, are the files inside the temp folder.
In the sixth window (optional), we will select any necessary folders for our app to function. Since we created the .exe with the option to store all execution content in the _internals folder, we will select it. If no additional folders are needed, simply choose Cancel.
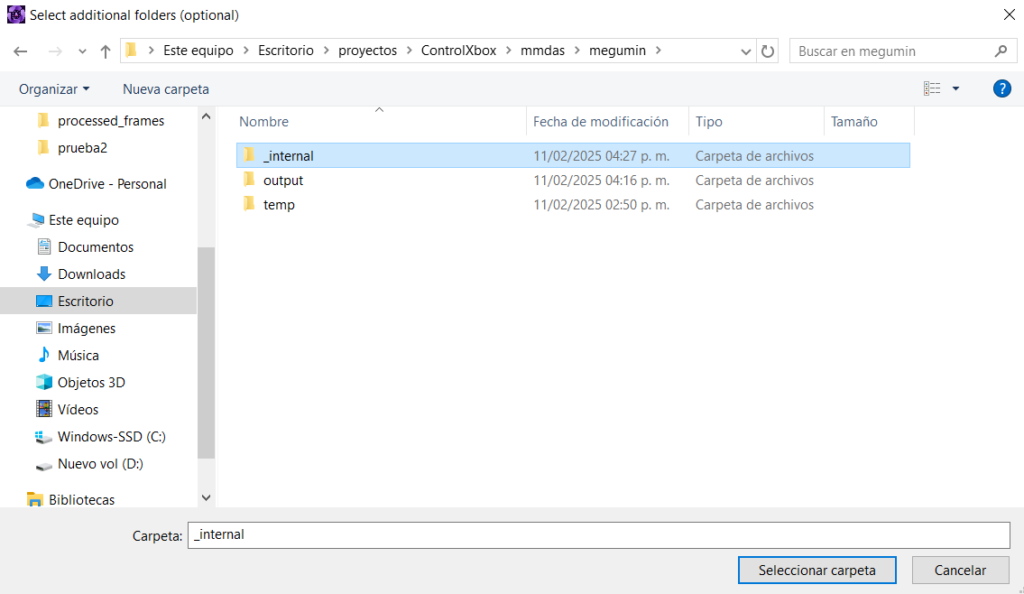
Finally, if everything went well, we should have our .mdaa file in the chosen directory. Now, the only thing left is to test it.
To run it, go to the same Advanced Code Animation menu, select the Load File option, and choose the .mdaa file we just created.

If everything was done correctly, the following data should appear in your window:
- The contents of your .mdaa file
- The preview image you selected
- A message confirming that core.exe was executed successfully
RESULT:
IMPORTANT NOTES:
For your .mdaa to be accepted when uploading it to the Workshop, you must meet the following requirements:
- Your app’s icon must be the one we provided for download.
- When creating your .mdaa, you must upload the source code in the resources section for review.
- Do not hide executables—all necessary files must be accessible.
You will be able to upload your .mdaa without issue, and it will appear in the Workshop. However, if someone tries to download it, they will see a warning message indicating that it has not yet been reviewed.
The review process takes 3 to 5 days. Once your .mdaa is reviewed and meets all the necessary requirements, the warning will be removed, and users will be able to download it without restrictions.
Bonus:
If you’re not skilled at programming, you can contact our team, and we will help you with your code without any issues. 😉
At Marro Industries, we are here to assist you!
Below, we provide the source file used in this tutorial in case you want to use it as a template for your future creations.
Animation menu
The Animation Menu allows you to play APNG, GIF, WEBP, PNG, and other formats.
Additionally, in its options menu (found under the gear icon), you have several settings to modify the behavior of animations. These options are useful for both MDAA files and regular animations.
You can adjust:
- Frame rate of animations
- Behavior modifications, such as enabling/disabling drag
- Volume control for animations with sound
- Other advanced settings
These features give you full control over how animations behave in AnimaEngine!
How to add audio to my animations